I wanted to get the flavor of a PaaS (Platform as a Service), so I installed the Cloud Foundry Developer version (cf-dev) which can be installed on a machined with enough RAM (min – 8 GB, more better), processing power, space (min 80GB, more better) and a fast internet (a lots of downloads required). If you don’t know about PaaS then I suggest you to read my earlier blog on the cloud.
After installing the cf-dev you can deploy your application easily, but this cf-dev does not have any service in it; not even the database. So, if you want deploy database enabled application in your cf-dev then you need to follow the given instructions to install the database service in cf-dev –
Prerequisite – this guide assumes that you have a cf-dev installed in a Ubuntu (other distro should also work)
Preface:
Before start, one might think why do we need to have a complex mechanism to just to enable database service. But in reality this is done the way it is to enable variety of services to be added to cloud foundry in a service provider/service type agnostic way. Cloud foundry does not care about what you are providing, it just want a way to provision and track the usage so that it can provide a given service as per user demand and track the usage to bill for it. In this way, cloud foundry ensures that the service provider getting paid for their service and the user can quickly and easily use many services by paying. Cloud foundry treats database service as one of such services.
In this mechanism we need a middle-man to facilitate an uniform interface between the cloud foundry and the service providers. This middle-man or the component is known as “service broker” in cloud foundry. A service must expose itself to cloud foundry via service broker. It has a well defined interface.
So, In order to enable mysql database service, we need to setup a mysql-broker to talk with cloud foundry. Fortunately cloud foundry provides the cf-mysql-broker for this task.
- Get the mysql release from the cloud foundry
git clone https://github.com/cloudfoundry/cf-mysql-release.git
- After cloning, cd into the directory and fetch the pre-built mysql release by invoking the update script. By executing the following commands you are essentially downloading the binary release of the mysql service for cloud foundry. Once downloaded use “bosh upload release” command to upload the binaries to the cloud foundry. In the last command make sure to choose the value of N according to your cf-dev version. If you are using the latest cf-dev, just use the highest value of N available in that folder. This N denotes the release version of the cf-mysql.
cd cf-mysql-release
git checkout master
./scripts/update
bosh upload release releases/cf-mysql-<N>.yml
- Now, we need to deploy the mysql to our IaaS. For this reason we need a deployment manifest. As we are using cf-dev so our IaaS is most probably virtualbox with bosh-lite as cloud-infrastructure interface. So, we need to generate the deployment manifest for the bosh-lite to start the deployment.
./scripts/generate-bosh-lite-manifest
bosh deploy
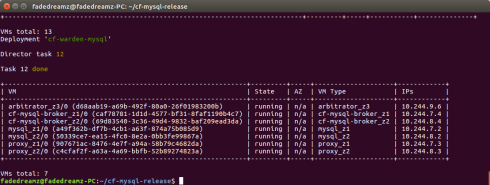
- after some times mysql will be deployed. check the deployment with “bosh vms” command. You should be able to see two table, and can identify the mysql nodes there. The first table will be cf-dev components.
bosh vms
Here is my pc’s screenshot for bosh vms output, showing the second table only –
- We are almost there. We have cf-dev and mysql service with cf-mysql-broker. Now we need to register the mysql service to the cf-dev. This registration will allow the admin to provide mysql service on demand to applications. The most easiest way to register the mysql to the cf-dev is to run following command –
bosh run errand broker-registrar
after the command successfully completed you can check if your mysql service is registered in the cf-dev or not by running following command
cf marketplace
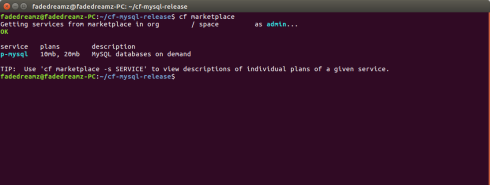
You should be able to see the mysql service there. It indicates that you can now lend on demand database usage to an application.
That is it for today, in future I will show how to provision (on-demand lend) mysql service to an application and how the application can use it.
If you have any comment or suggestion, please leave a comment.


