Ubuntu Subsystem on Win10 with GUI

So, I am happy that the ubuntu subsystem is available on windows 10. Having a ubuntu subsystem helps a lot to quickly try out some tool and program without rebooting into linux (Yes I am looking at that NS-3, which has no support for windows). However this subsytem has a limitation when it comes to try out anything that is GUI based.

Fortunately there is a easy way to make the GUI works with the ubuntu subsystem (God Bless Linux). Yes, the bad old X11 server-client architecture. So, lets check out how can we use the linux GUI based application on windows.

vim ~/.bashrc
  • Goto end of the .bashrc file and add the following line, then save the .bashrc and exit the editor
export DISPLAY:=0
  • Now you can either exit and enter into bash or enter following command to apply the changes
source ~/.bashrc
  • To use the GUI you need to run the X11 server on windows, there should be an icon your notification area which looks like X
  • Now you can run any GUI based application from the bash and work on it 🙂

Following is a screenshot of ns-3 python visualizer running on ubuntu on windows-10

If you have any comment or suggestion, leave a comment below.


C++11 with eclipse-cdt

Many modern programming language has cool language features like lambdas and automatic memory management. You can also use some of these modern and cool features in C++11. But writing C++11 in eclipse is not straight forward, as you need to configure for it. I will explain the configuration requirement for eclipse-cdt so that you can writing C++11 code in it.

  • I will be using eclipse neon for this demonstration but it should work with other version of cdt as long as the compiler has C++11 support for it.
  • I will only consider GNU-C++ compiler but it should work with other compilers (give it has support and you know the flags)
  • I am using linux (ubuntu) as platform. So, to use threading, I need pthread library. You may or may not need it based on your platform.

Let us first consider a simple C++11 code in eclipse.

Fire up your eclipse and create a new C++ project, lets call it “helloworld” and put the following code to it.

#include
#include #include
#include
using namespace std;

int main() {
future val = async(std::launch::async, []() {
return string(“hello world c++11”);
});
cout << val.get() << endl;
return 0;
}

This program is demonstrating two features of C++11; threading and lambda functions. The async method spawns a thread which invokes the lamba function to returns a string. This value will be captured by the future type.

Now whenever we try to access the output by calling the val.get() it will stop executing the main process until the value is returned by the threaded function.
See how easy it was to create thread and synchronize them?

Now if we try to compile the project, it will give you bunch of errors. Because cdt is trying to compile the project according to old C++ standard.

So let us first solve the issues one by one.

Fix the compiler:

Problem: Compilation failing.

Reason: Compiler is trying to use the old C++ standard to compile the project.

Solution: Tell the compiler to compile your project in C++11 standard.

Steps:

[Project]–> Right Click –> Properties –> “C/C++ Build” –> “Miscellaneous” –> “Other Flags” –> Add “-std=c++11” at the end.

003

This flag tells the compiler that it should use C++11 standard while compiling the code.

Now add the pthread library. We need it because we are using threading library, which in turns depends on pthread in ubuntu.

[Project]–> Right Click –> Properties –> “C/C++ General” –> “Paths and Symbols” –> “Libraries” –> Add –> put “pthread” and click ok.

008

Now if you try to compile your code will compile correctly and can execute.

Fix the editor:

Problem: Auto complete is not working properly.

Reason: Editor does not see the C++11 types

Solution: Force editor to see the C++11 types

Steps:

[Project]–> Right Click –> Properties –> “C/C++ General” –> “Preprocessor Include” –> “GNU C++” –> “CDT User Setting Entries” –> Add

005

In the new popup box select type as “Preprocessor Macro”, set Name field as “__cplusplus” and the value to “201103L”. Click “Ok” and “Apply” to go back to project.

Why did we add __cplusplus=201103L? Because if you go into any C++11 headers you will find that, if this variable is not defined accordingly, then the editor cannot see the new types.

004

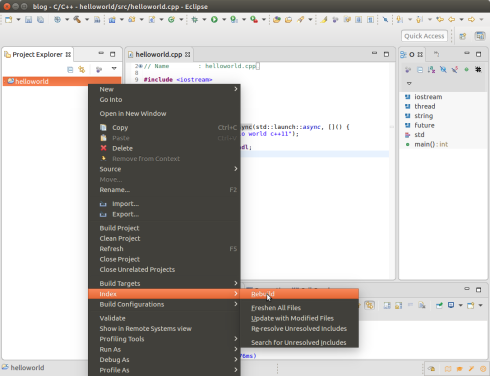
Right click the project and hover over “Index” and click “Rebuild”.

007.png

Happy coding in C++11.

Leave question or suggestion in the comment section.


Adding mysql service to your local PaaS (cf-dev)

I wanted to get the flavor of a PaaS (Platform as a Service), so I installed the Cloud Foundry Developer version (cf-dev) which can be installed on a machined with enough RAM (min – 8 GB, more better), processing power, space (min 80GB, more better) and a fast internet (a lots of downloads required). If you don’t know about PaaS then I suggest you to read my earlier blog on the cloud.

After installing the cf-dev you can deploy your application easily, but this cf-dev does not have any service in it; not even the database. So, if you want deploy database enabled application in your  cf-dev then you need to follow the given instructions to install the database service in cf-dev –

Prerequisite – this guide assumes that you have a cf-dev installed in a Ubuntu (other distro should also work)

Preface:

Before start, one might think why do we need to have a complex mechanism to just to enable database service. But in reality this is done the way it is to enable variety of services to be added to cloud foundry in a service provider/service type agnostic way. Cloud foundry does not care about what you are providing, it just want a way to provision and track the usage so that it can provide a given service as per user demand and track the usage to bill for it. In this way, cloud foundry ensures that the service provider getting paid for their service and the user can quickly and easily use many services by paying. Cloud foundry treats database service as one of such services.

In this mechanism we need a middle-man to facilitate an uniform interface between the cloud foundry and the service providers. This middle-man or the component is known as “service broker” in cloud foundry. A service must expose itself to cloud foundry via service broker. It has a well defined interface.

So, In order to enable mysql database service, we need to setup a mysql-broker to talk with cloud foundry. Fortunately cloud foundry provides the cf-mysql-broker for this task.

  • Get the mysql release from the cloud foundry

git clone https://github.com/cloudfoundry/cf-mysql-release.git

  •  After cloning, cd into the directory and fetch the pre-built mysql release by invoking the update script. By executing the following commands you are essentially downloading the binary release of the mysql service for cloud foundry. Once downloaded use “bosh upload release” command to upload the binaries to the cloud foundry. In the last command make sure to choose the value of N according to your cf-dev version. If you are using the latest cf-dev, just use the highest value of N available in that folder. This N denotes the release version of the cf-mysql.

cd cf-mysql-release
git checkout master
./scripts/update
bosh upload release releases/cf-mysql-<N>.yml

  • Now, we need to deploy the mysql to our IaaS. For this reason we need a deployment manifest. As we are using cf-dev so our IaaS is most probably virtualbox with bosh-lite as cloud-infrastructure interface. So, we need to generate the deployment manifest for the bosh-lite to start the deployment.

./scripts/generate-bosh-lite-manifest
bosh deploy

  • after some times mysql will be deployed. check the deployment with “bosh vms” command. You should be able to see two table, and can identify the mysql nodes there. The first table will be cf-dev components.

bosh vms

Here is my pc’s screenshot for bosh vms output, showing the second table only –

screenshot-from-2016-11-05-16-48-06

  • We are almost there. We have cf-dev and mysql service with cf-mysql-broker. Now we need to register the mysql service to the cf-dev. This registration will allow the admin to provide mysql service on demand to applications. The most easiest way to register the mysql to the cf-dev is to run following command –

bosh run errand broker-registrar

after the command successfully completed you can check if your mysql service is registered in the cf-dev or not by running following command

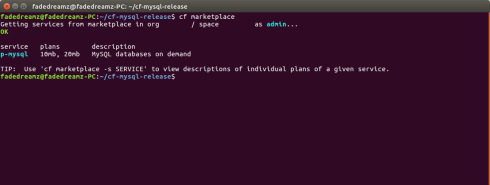
cf marketplace

screenshot-from-2016-11-05-17-03-27

You should be able to see the mysql service there. It indicates that you can now lend on demand database usage to an application.

That is it for today, in future I will show how to provision (on-demand lend) mysql service to an application and how the application can use it.

If you have any comment or suggestion, please leave a comment.


Your own compass in Android

Two months ago, I developed an islamic application in android and published it. And just like any other islamic application, Qibla direction is an essential feature. But to implement it, I had to read a lot and do some experiment. Today I am going to explain the theory behind the compass along with the example so that you can also develop your own compass in android.

First thing first, before making a compass work, we need the sensors in our device in action. To make it tick, the android framework provides a function to register for a particular sensor. For compass, we need two sensors; magnetic field and accelerometer. So, lets go.


Todo # 1 – First we need our fragment to implement the callback to be able to get the sensor data from android

public class CompassFragment extends Fragment 
                 implements SensorEventListener {
 ...
@Override
    public void onSensorChanged(SensorEvent event) {
        // we will get sensor data in this callback
    }
 ...
}


Todo # 2 – Next we will register to android framework to get the appropriate sensor data

SensorManager mSensorManager = (SensorManager) getActivity
    .getSystemService(Context.SENSOR_SERVICE);

mSensorManager.registerListener(this, mSensorManager
    .getDefaultSensor(Sensor.TYPE_MAGNETIC_FIELD),
    SensorManager.SENSOR_DELAY_UI);

mSensorManager.registerListener(this, mSensorManager
    .getDefaultSensor(Sensor.TYPE_ACCELEROMETER),
    SensorManager.SENSOR_DELAY_UI);


Section # 3 – Now lets back to some theory. We have two north, one is magnetic north and another one is true north. Magnetic north is the north pointed by a compass, where true north is actual north of earth. The angle between them is called magnetic decline (expressed in angle) [1].

220px-magnetic_declination-svg1

Azimuth is the horizontal angle measured clockwise from true north [2]. So, to calculate azimuth we need to compensate for magnetic decline also.

350px-azimuth-altitude_schematic-svg1

Luckily android has some easy way to calculate the Azimuth. Lets see how.

float [] mGravity;
float [] mGeomagnetic;
@Override
    public void onSensorChanged(SensorEvent event) {
        if (event.sensor.getType() == Sensor.TYPE_ACCELEROMETER)
            mGravity = event.values;
        if (event.sensor.getType() == Sensor.TYPE_MAGNETIC_FIELD)
            mGeomagnetic = event.values;
        if (mGravity != null && mGeomagnetic != null) {
            float R[] = new float[9];
            float I[] = new float[9];
            if (SensorManager.getRotationMatrix(R, I, 
                                  mGravity, mGeomagnetic)) {
                float orientation[] = new float[3];
                SensorManager.getOrientation(R, orientation);
                float degree = (float) Math.toDegrees(orientation[0]);
                float actualAngle = getBearing(degree);
                // rotate your compass image by actualAngle
             }
         }
     }

Azimuth is given by the function SensorManager.getOrientation(), it expects rotation values and convert them into azimuth, pitch and roll respectively. But in order to to get the rotation values, we will be using SensorManager.getRotationMatrix() api. It converts the magnetic sensor data and gravity data into rotation values. Check the api documentation to get more idea on it. After getting the azimuth we convert it to degrees and call our getBearing() function to calculate the angle between us and a particular point of interest.


Todo # 4 – calculate bearing between our location and location of interest

First lets define our and location of interest –

Location mMyLocation = new Location("MyLocation");
Location mKabaLocation = new Location("Kaba");
private final float kabaSharifLongitude = 39.8261f;
private final float kebaSharifLatitude = 21.4225f

You can change the mKabaLocation to whatever location you want.

As I have explained earlier azimuth is calculated from true north, so we need to compensate for the angle between true north and magnetic north. Android provides an api to calculate the magnetic decline easily, given your GPS latitude, longitude and altitude; it can calculate the magnetic decline in degree. So, using the GeomagneticField class provided by android, lets calculate the magnetic decline.

GeomagneticField mGeoMag = null;
public void onResume() {
        super.onResume();
        mGeoMag = new GeomagneticField(mMyLatitude, 
                      mMyLongitude, mMyAltitude, 
                      System.currentTimeMillis());
        ...
}

This is our initialization of GeomagneticField class using our latitude, longitude and altitude. Next, let us adjust our compass heading to calculate the actual angle by which we should rotate our compass image –

public float getBearing(float heading) {
        if (mGeoMag == null) return heading;
        heading -= mGeoMag.getDeclination();
        return mMyLocation.bearingTo(mKabaLocation) - heading;
 }

At first, we subtract the decline to align our azimuth value to magnetic north. Then we calculate the angle between two location and adjust our compass angle with it. That is it, we have now the required angle of rotation for the compass image.

Here is how the final output of the implementation looks like –

screenshot_20160914-034850


Leave a comment if you have any suggestion or questions.

All the images used here are used for educational purpose.

References –

  1. https://en.wikipedia.org/wiki/Magnetic_declination
  2. https://en.wikipedia.org/wiki/Azimuth

Easy and quick ipv6

A few days back I had to work with ipv6. Being familiar with ipv4 I thought ipv6 would be straight forward for me. Well, it is but with a twist. To uncover the twists I will go through an overview of ipv6.

  • ipv6 128bit address where ipv4 is 32bit

Most obvious one, ipv6 provide more address than the ipv4, and it was introduced for this purpose.

  • ipv6 CIDR vs ipv4 CIDR

You may have seen ipv4 CIDR prefix, something like 192.168.1.0/24; and you will also see it in ipv6. But the main difference is that ipv6 does not mandate the use of the prefix by itself to recognize network address.

  • Address types

ipv6 has local, global, multicast and anycast address type where ipv4 has local, global, multicast and broadcast. Don’t think ipv4 broadcast is rebranded as anycast in ipv6.

local is for your link local and private network. They are the same in ipv6 and ipv4.

global is for the global routable address. They are also the same for both ipv6 and ipv4.

multicast is a special kind of address which can be used to group a number of systems and can be used to broadcast a particular information to all of the systems within that group. The main difference between ipv6 multicast and ipv4 multicast is that ipv6 multicast is intended to be routable.

Anycast is a special type of address which can be assigned to multiple systems (yes the same address). And any system can get the request from the requester. Maybe with ipv6 you can design your own load-balancing service by using the anycast scheme.

There is no notion of broadcast address in ipv6. Now the switch and router will have much more easier time while dealing with ipv6 packets.

  • Address shorting

It is not easy to write the full form ipv6 in hexadecimal format. Suppose you have the following ipv6 address

fe80:0000:0000:0000:2000:0aff:fe97:0e21

now imagine you have to type this whole address or even remember it! To ease our lives, there is an ipv6 address shorting rule,

Rule-1: replace consecutive block of 0 with “::”

Rule-2: remove leading 0 from the address within a block

By block, we mean the 4 hexadecimal value separated from next one by a ‘:’. So, in our example, it would be 8 blocks (8 blocks x 4 digits x 4 bits/digits = 128 bits).

Now applying rule-1, we can remove block 2,3,4 (considering left to right) with a single ‘::’ thus becoming –

fe80::2000:0aff:fe97:0e21

Applying rule-2, we can remove the 0 from 6th and 8th block we have

fe80::2000:aff:fe97:e21

So our new address has become more manageable

localhost in ipv6 is referred as ::1 in shortened form.

To represent ipv4 address in ipv6 we can simply use the last two block (32 bits) to represent the ipv4 address (32 bit) and use all zero in all other blocks, so if you have an ipv4 address like

192.168.1.254

Then your ipv6 address will be –

::c0a8:1fe

As c0 hex of 192, a8 is hex of 168, 01 is hex of 1 and fe is the hex of 254. And obviously, apply the rule-2 for address shortening.


To set ipv6 in your linux system use ip or ifconfig. and use ping6 tool to ping the ipv6 address with the following syntax –

ping6 <ipv6 addr>%<interface>

I will later post a blog on simple udp server talking with an udp client over the ipv6 network. And obviously with a little twist as well.

Leave a comment if you have any suggestion or question.


Enable Internet Access in your Android App with Volley in 5 easy steps

Google’s volley library is a very easy way to access and get the response from an internet endpoint. You will need 5 (or less) steps to make is serving your URL requests.

Step – 1: Add the following dependency to your application gradle file. As of writing this blog, the latest version for volley is 1.0.0

compile 'com.android.volley:volley:1.0.0'

Step – 2: Define a RequestQueue to queue up the requests

private final RequestQueue mReqQ;

Step – 3: Create the queue, you will need context  as the only parameter required

mReqQ = Volley.newRequestQueue(context);

Step – 4: Anytime you need to fetch response, create a request along with two callbacks. These callback will be invoked once volley has finished proccessing the request.

StringRequest mNewReq = new StringRequest(Request.Method.GET, url, 
 new Response.Listener<String>() {
    @Override
    public void onResponse(String response) {
        // we have the response, now do something with it
    }
}, new Response.ErrorListener() {
    @Override
    public void onErrorResponse(VolleyError volleyError) {
        // our request has failed!
    }
});

Step – 5: Queue the newly created request

mReqQ.add(mNewReq);

Volley not only ease up the internet access from android app, it also provides a very good way to issue multiple requests.

Leave a comment if you have any suggestion/question.


Demystifying the Cloud (IaaS/PaaS/SaaS)

So, I got a chance to work on a product which was based on social networking. And before I joined the team, they were using Heroku, a cloud-based platform. At that time, I was wondering, what the hell is Heroku? how does it work? Eventually I came to know that they are a PaaS provider. Now again I was wondering, what the hell is this cloud business? After a lot of reading and studying some papers(!), I think I now understand the buzz words of the cloud, the IaaS, the PaaS and the SaaS.
To understand the cloud business you first have to understand the lifecycle of an actual product which is aimed for a significant amount of users. Below is an abstracted flow of a development-deployment cycle:

development-deployment-cycle

We, the developer are mostly interested in developing the system, applying bug-fixes, adding new features and not interested in deploying the system in the actual environment. Deployment mainly related to DevOps guys, and they have a hard time managing it. Because they need to make sure the correct library is running which are required by our developed application, patching the system if any critical bug was fixed and upgrading the whole system if required. And to be honest we, the developers know, these are a painful and time-consuming task.

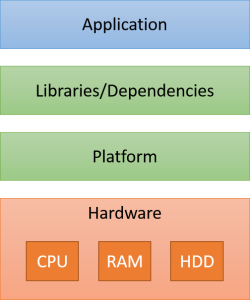
Now suppose we are to develop and deploy a product. From high level after deployment the overall system would look like something like below:

overall

At the highest level, our app is running, which is providing the actual experience to its user. But the application is obviously running on a platform depending upon a set of libraries of frameworks. And again the OS or the platform itself is running over actual hardware. So, in order to deploy the application we have to know different specific requirements from different perspective (e,g : which CPU, how much RAM, how much bandwidth from Hardware perspective).

Enter IaaS:

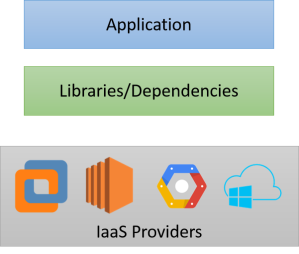
Now what if we don’t want to manage the hardware part of our high-level view? Hardware can be viewed as infrastructure which facilitates our application growth/deployment. And if you don’t want to manage them, just go to someone who provides them as a service, A.K.A Infrastructure as a service provider, hence IaaS provider. There are many IaaS providers, amazon, google, microsoft (azure), vmware, rakespace etc.

If you pay the IaaS they will provide you with VM (Virtual Machine) of your desired OS, CPU, RAM, network bandwidth and then you don’t have to manage them, they will manage the VM for you.
Now our overall view becomes a less complicated than before:

IaaS-overall


Enter PaaS:

A lot of pain was abated but still there is room for serious pain. We still need to install the correct library, manage them and update them if any security patches are released by them. Also, there are some complex dependency tree for some high-level languages. They are painful to maintain. If one broke, all of them crumble down. So, now we would like to remove this pain also. Enter PaaS A.K.A Platform as a service. You just buy any popular PaaS solution and it will have all the dependencies your application need. You upload your code, your app is instantly deployed into the real world. It is just the dream come true!

There should be a lot of PaaS providers, but I know only about heroku and pivotal.

So, with PaaS our overall view looks like below:

pass-overall


Enter SaaS:

Now, what if our employer thinks that they don’t need our cool software, they don’t want to invest money to continuously manage it, improve it; instead they just want to use it. Well sadly for us, SaaS A.K.A Software as service provides such application to the user. And sadly we also use it 🙂 . Google Docs is a fine example of SaaS, you can buy their premium service and you will get the whole suit for your corporation without investing any money to develop it, manage it or to deploy it.


I hope my examples were clear enough to demystify the Cloud. One may infer that SaaS is deployed over PaaS. But be aware, that might not be the case. But it is possible to do so and in fact, it is logical to do so.

If you have any suggestion or comment, please leave them in the comment section.

The images were used for demonstration purpose and are registered trademark of their  respective company.


Setup your personal NFS Server on RPI in 6 Steps

Setting up NFS server on a raspberry is straight forward. But sometimes trivial things become a reason for headache when something goes wrong. I had the opportunity to work on a project where I needed to edit and compile binaries on RPI. As RPI is not a good candidate for an IDE so I mounted the whole home folder to my Ubuntu desktop and used eclipse IDE. It enabled me to access the code more easily, saving so much pain and time.

Today, I am going to share how can you enable NFS server on RPI and how to mount it on your linux system (read Ubuntu).

For RPI, my distro was raspbian but it should be almost similar for other distro’s too. Once you have got your RPI booted up and logged into the raspbian follow the steps below –

Step – 1 : Install NFS Kernel Driver into raspbian

As it is not installed by default, fire up a terminal and issue the following command

sudo apt-get install nfs-kernel-driver nfs-common

If you get complain that it cannot find nfs-kernel-driver then first issue the repo update command

sudo apt-get update

Step – 2 : Specify which path to export (Read share)

Now that you have installed the kernel driver, the setup process will generate a file  /etc/exports

To enable your desired path to be shared, open the file in your favorite editor and add some rules at the end of the file. The general rule can be described as –

<path-to-share> <allowed-client-ip-to-connect> (options)

So if I want to share /home/fadedreamz directory with everyone, I need to add the following rule to that file –

/home/fadedreamz * (rw,sync,no_subtree_check)

Remember, to avoid corruption it is best to use sync option. async is faster but very very dangerous, as it can cause data/fs corruption. * means that we will allow everybody (i,e it will match with any ip).

Step – 3: Restart the nfs server

This is straight forward

sudo service nfs-kernel-driver restart

At this point if you have no error then you can skip to Step – 5.

Step – 4: Troubleshoot nfs server

If you are having issue running the nfs server, which is stopping saying something is wrong with portmapper, then first try updating the rpcbind rules

sudo update-rc.d rpcbind defaults

Now try to start the nfs kernel server again

sudo service nfs-kernel-server restart

If this still fails due to the same goddamn’ portmapper then just restart the rpcbind service

sudo service rpcbind restart

And then try to start the nfs kernel server, now it should run without any issue.

sudo service nfs-kernel-server restart

Step – 5: Add mount rule for client

We want to mount it whenever we want. So, open up /etc/fstab file in your client pc and add the following rule (I am considering my exported path is /home/fadedreamz from Step – 2)

# format is 
# <server-ip>:<expoted-path> <mount-point> <file-system> <fs-options> <options> 
# so if our server-ip is 192.168.0.1 (for e,g) then following rule is needed
192.168.0.1:/home/faedreamz   /home/ubuntu/rpi   nfs4    users,_netdev,rw  0  0

Here users option will allow any user to mount the fs (without root permission). This is very convenient considering you can mount the fs from nautilus by clicking the auto created entry point (Read below to find more). # in the file is used to explain what is what, they are comments and will be ignored by the nfs-kernel-server.

Step – 6:  Mount the filesystem and enjoy

Just issue

sudo mount -a

in a terminal and enjoy the NFS fs in the mount point you specified earlier.

One benefit of using the mount point within the home directory is that nautilus (File Explorer) automatically create a sidebar entry which allow the user to navigate quickly and easily.

That’s it, you now have a full functioning NFS Server and a client connected to with. Now go edit your source code using powerful IDE and compile it instantly on RPI 🙂

Or you may choose to do whatever you like 🙂


Implicitly linking DLL with VS2010 or earlier ;)

You may be wondering what is “Implicit DLL linking”. There are two way to link to a DLL one is “Implicit” another one is “explicit”.

When you are the builder of the DLL or you have the exported symbol definition file or the exported lib, you can add the DLL simply by incorporating the .DEF (definition file) or the .lib file to the project properties.

But when you do not have the any of the things mentioned above, you have to load the DLL explicitly by using “LoadLibrary” win32 API, get the function pointer by calling “GetProcAddress” and the calling the function using the function pointer.

Today I am going to discuss how to “Implicit” link DLL file into your application.

First open a DLL project – usually a win32 project.

win32 DLL project window

Then select DLL from the next window to open the project as a DLL project.

Next I am going to add a header file called Math.h and add some basic function there. which I will export through DLL and use it in a console application.

the Math.h file

#pragma once

class __declspec(dllexport) Math {
public:
    int add(int a, int b);
    double sqr(double a);
}

and the cpp file

#include “Math.h”

int Math::add(int a, int b) {
    return (a+b);
}

double Math::sqr(double a) {
    return (a*a);
}

__declspec(dllexport) will tell the compiler that this class should be exported by the DLL for use in application.

Building this project will generate two components.

1. the DLL file itselfv [myDLL.dll]

2. a lib file which holds the necessary stubs and initializations to call appropriate DLL function  [myDLL.lib]

to incorporate DLL into an application one has to include the .lib into project dependencies.

Thats all. Now you can build your application and use the DLL function very easily.

Hope this helps.

If you have any queries or suggestions, please leave a comment.


Optimizing the Solution …

Sometimes developers are over excited about creating an optimized solution by optimizing & refactoring the code. They try to optimize every bit and line to their heart’s content. Optimization is an art, but sometimes you gotta admit that overdoing any art, loses it’s beauty. So, what optimization process should be followed? Well, I want to share my view on that matter.

Create a solution but don’t bother about the “Perfect solution”

What good a highly optimized, well written & well maintained code base can do, when it can not solve the problem? The simple answer is nothing. Every solution is written so that it could solve a problem. If you are given a non working but nicely written application will you choose it over a badly coded working solution? I guess, you got the point.

Optimize the solution but never over do it

Then next state would be optimize the solution. After you have a solution you can make it more better. Break the function into small functions. Group the class into a module. Apply DP where appropriate.

The 90 – 10 rule Try to optimize the section which consumes most of the time.

The 90 – 10 rule follows as – 10% of code constitutes 90% of total running time of the application. Have you ever think of any solution not having a loop? Have you seen a complex algorithm not having several loops? These loops are the CPU cycle hogger. They are the 10% out of 100% code. Try to optimize that 10% before optimizing other sections. Slight improvement over that 10% will leave a mark on the performance of your application.

Thank you for reading.